Field soil platform

with No Comments

I spent some time yesterday resurrecting the soil humidity & temperature and high temperature water platform that Ivan, Kristin, and I originally made (and re-made) in 2013 and 2014. I was able to find all the parts, re-assembled it, found an Arduino sketch in the Sparkle Share folder, and viola it worked. The wiring and sketch are documented here.

IMAG0446

Back to list management…

The low point of my day…

with No Comments

As near as I can tell from a quick look at the data collected by Field Day and Grace (our prototype ambiance platform) and the Yocto altimeter (based on the same MPL3115A2 chip that we use) this was the low point of my day yesterday at about 201m:

IMAG0439

I started Field Day and the Yocto around Portland, Indiana and then drove home and walked down to the creek where this picture was taken. The highest point in Indiana is about half-way between Portland and where we live in Boston. The creek bed is the limestone floor of the ocean that covered this part of the US about 350mya. Neither device was calibrated, and we won’t know for sure how the track looks until Craig maps the data, but things are looking good.


In other news Nic has collected data from the LiDAR in the lab as it moved slowly over an object on the floor. We’re collecting theta, distance tuples at set intervals (1cm) along the track, I think we can visualize these as stacked wind roses as a first-order approach to “seeing” what it found. Matplotlib to the rescue!

Ambiance and a Feather

with No Comments

So, it’s been a little while since my last post. Here’s a quick update. I assembled our ambiance platform using the Adafruit feather and two sensors: Altimeter and Temperature, Humidity and Pressure. The Adafruit feather is a tiny BLE capable micro controller (like a Light Blue Bean). We decided to go with the feather because the BLE chip it uses is Nordic, like the Red Bear Labs BLE Shield. With the Nordic chip we can make our own services with UUIDs. The Bean has a built-in set of UUIDs and communicates differently than the Nordic chip.

The platform sensors currently use two different communication protocols: I2C and SPI, but we decided that probably wasn’t going to be a problem. I was able to solder on the sensors to a prototyping board and upload a sketch. I tested without the BLE first time to make sure it was working. It was, thanks to sample code from Adafruit! Adafruit has a different BLE library but it’s all the same principal. I tested the BLE code with Field Day and all works well. A picture of the ambiance platform is below.

Let’s design some stuff

with No Comments

Tara and I designed and prototyped a couple of bench and field devices recently. We have a first pass at a Falcon tube turner, a soil microbe quantifier and a soil temperature and humidity probe.

The Falcon tube turner is designed to be used on a bench to mix soil samples as part of the pH, etc. protocols. Currently it’s based on Lego components, if that basic design works we can easily fabricate a couple robust enough for our needs.

Tara has an idea to quantify the amount of soil microbes by measuring their CO2 respiration. We have data for this from 16S extractions done at one of archeology sites at Skalanes, we can re-sample there and compare the two methods. Pictured below is our first pass at a device for doing this.

IMAG0398

The soil temperature and humidity probe is a combination of a stainless steel soil coring tool with the two probes built-in to the end of the tube, see below (kind-of).

IMAG0399

I’ve been working on reconciling the data model with the implications that Kristin brought when we worked-through the sensor <-> Arduino <-> BLE <-> Android <-> data model. Stay-tuned for the details.

Light Blue Bean!

with No Comments

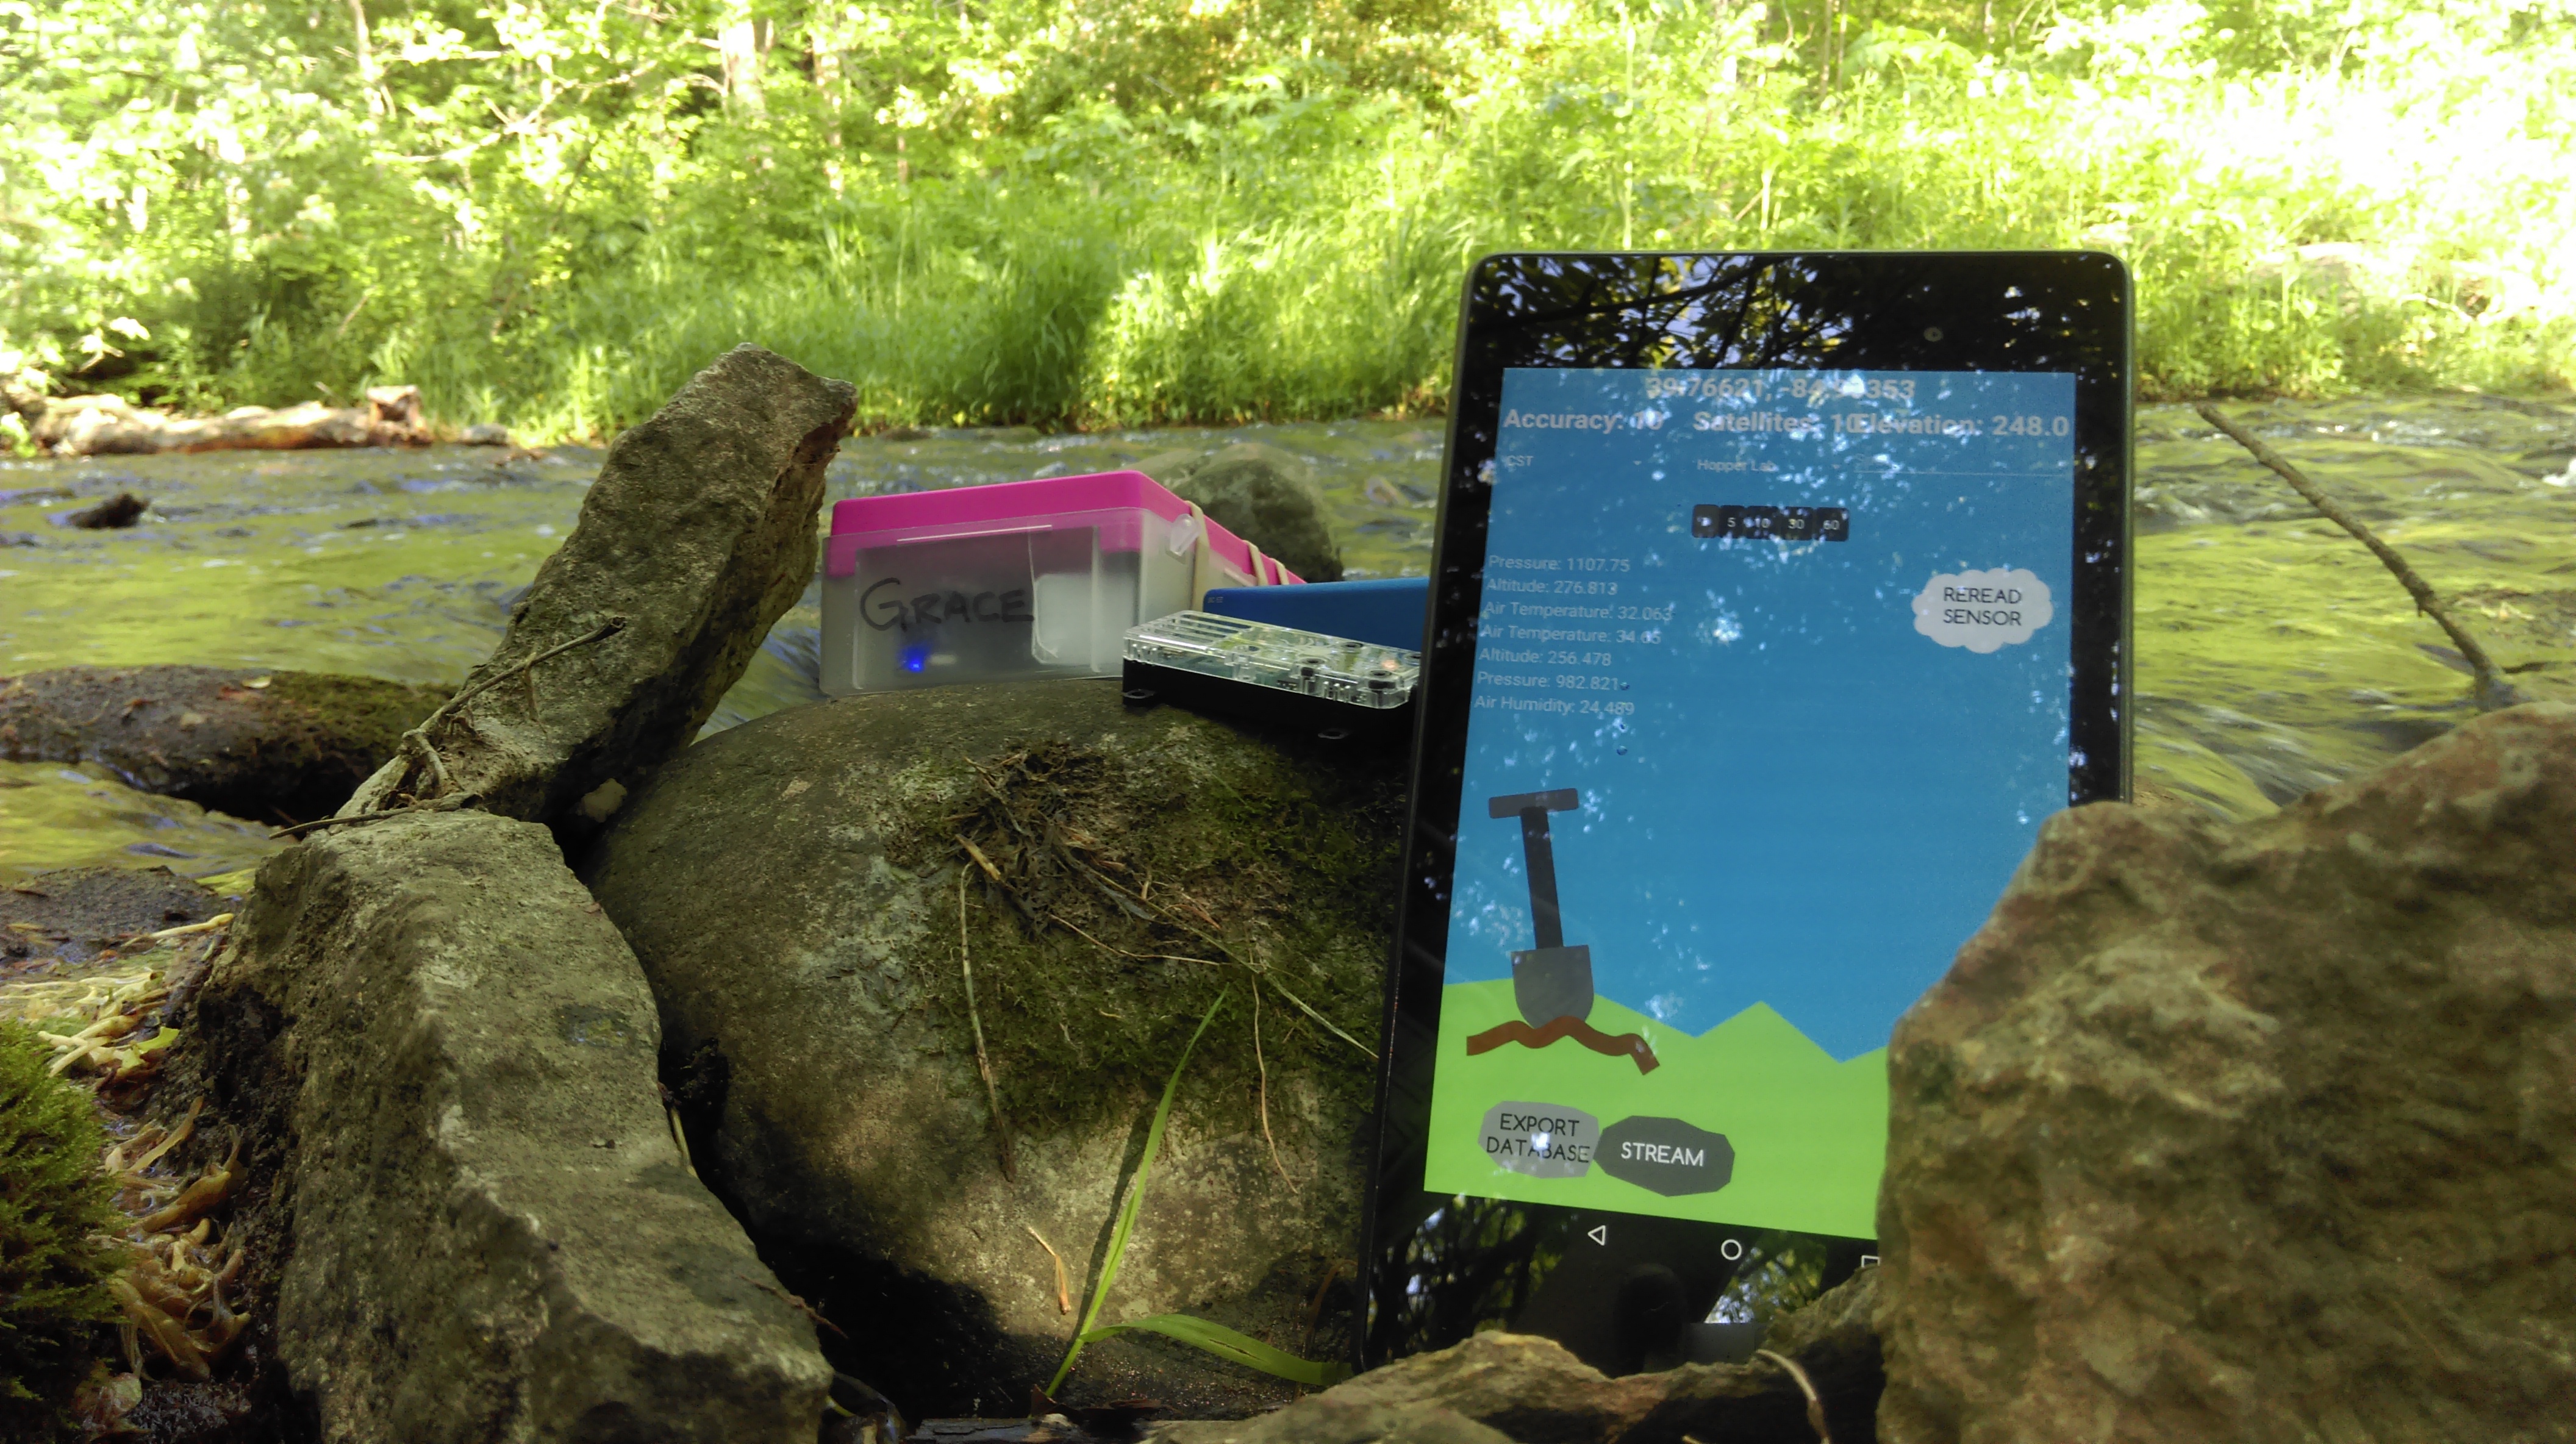
In my last post, I said that I was going to switch all of our individual fragments of sensors to one that is ‘Bluetooth Sensors.’ Since then, I have finished that and redesigned even more of Field Day.

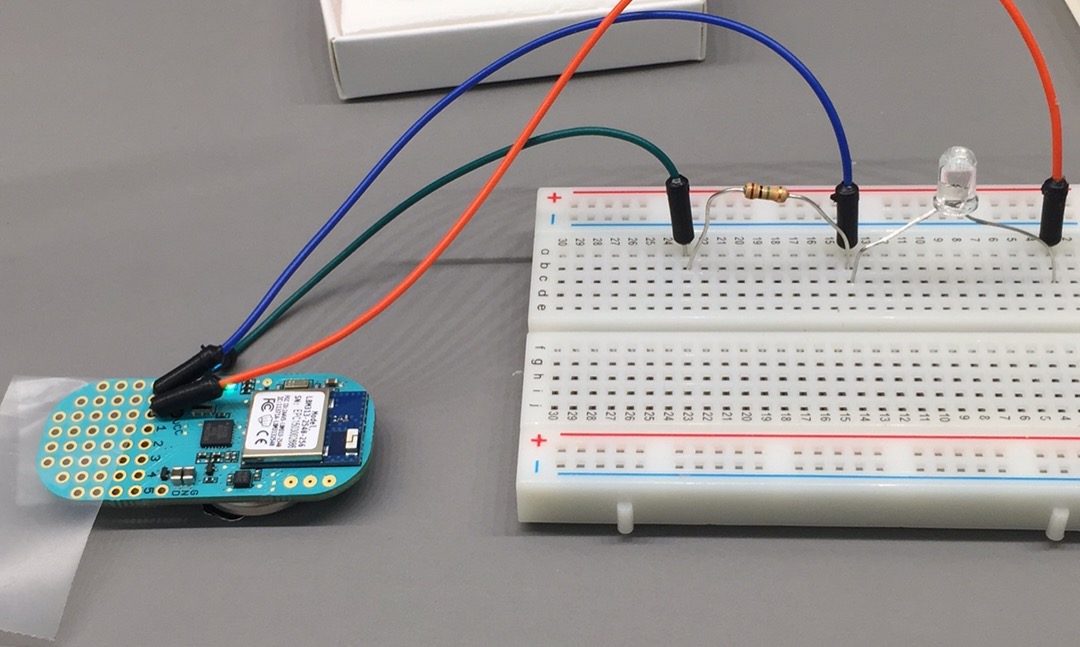
After I finished switching all the fragments to one, I dove into working on BLE connection with the Light Blue Bean (LBB). Unfortunately, the LBB does not do Bluetooth the same way the Red Bear Labs shield does. The LBB uses something called ‘Scratch Characteristics.’ These are built-in 5 characteristics that can be written and read from the client (in this case, Field Day) and the server (the LBB). These characteristics have set UUIDs, so that means I can’t use the custom UUIDs I set for the RBL’s sensor. After browsing some of the android SDK code from Punchthrough (the people that made the LBB), I was able to determine the UUIDs that are used for the characteristics. Since Field Day is going to have to determine what kind of device it is connected to, I redesigned it so that the fragment is cleaner and doesn’t do any of that work. There are separate classes for a Bluetooth Sensor, GATT Client, and Bluetooth Service. The Service talks to the Sensor and the Sensor talks to the GATT client and determines what type of device it is connected to by checking the UUIDs. All the Fragment does now is say when it wants to write a message or read a message.

Punchthrough has sample code available for arduino and reading and writing the scratch characteristics. The examples along with the SDK has proven helpful when rewriting the android code to accommodate for the Bean. Unfortunately, not many people have used the Bean with Android. All of the examples are with iOS. Field Day is able to read scratch characteristics just fine from the Bean, but is currently unable to write to any characteristics. One huge problem with the bean is that everything is Bluetooth. It’s not like arduino where you plug in the device to your computer to upload code and power it on. This means that the Bean can only be connected to one thing at a time and thus, is really hard to debug. Typically when debugging arduino devices, I’m able to plug the device into my computer and watch the Serial monitor for debugging code I’ve added in. With the Bean, I cannot. It’s blind debugging and it sucks. I’m still working on figuring out how to write a characteristic and have the bean read that characteristic, but I think I’m getting closer. I hope to finish that this week.

The Bean arrives!

with No Comments

Last week, the bean arrived! We got four beans in the mail, which came with a ‘Maker Kit.’ The Maker Kit really just contained some headers, a buzzer, and your basic accessories. I was able to connect to all four of the Beans through my computer and my phone! It’s pretty cool that you can connect and upload code right from your phone. The ‘Bean Loader’ computer application integrates with Arduino really well. You write the code in the Arduino IDE, and just send it to the Bean through the Bean Loader. I followed this guide OSX Starting Guide to get started using the bean with my laptop. This is the guide I followed for iOS Guide for setting it up on my iPhone.

Unlike most Arduino board, the Bean has no headers already soldered in. We don’t want to solder right away. We still need to make a prototype and test that it works. So, what I did was set up a little prototyping configuration using a breadboard and some wires. You can see it below — it’s a light sensor. The LED on the Bean gets brighter as it detects more light and dimmer as it detects less light. I was able to get this running with the Bean Example Projects page.

IMG_0408

I’ve been looking through different websites like MakerShed, SparkFun, and Adafruit for different ambiance type sensors. There are many options to choose from, that have a wide range in prices. What sensors to get, we should probably decide as a group. Also, the Bean has a built-in Temperature sensor that we need to test, and perhaps we could cross that off the list of sensors to buy.

LightBlue Bean for Ambiance <3

with 2 Comments

After our meeting last Monday, we have decided to step away from Yoctopuce devices for any platform, but specifically the ambiance platform. Although, the Yoctopuce devices are nice, and have the ‘plug and play’ option, they are expensive and complex (in terms of debugging) compared to other options.

We are moving to Arduino-like design for the Ambiance platform. After some research, I found a device called the LightBlue Bean (see below). The LightBlue Bean is a very small device that is configured entirely through Bluetooth Low Energy. You can even upload code on the go with an Android or IPhone application, which is exactly what we need. The Bean has the same chipset as an Arduino, and even has a built in Temperature sensor. A key characteristic of the LightBlue Bean is the on-board battery. In the past, we’ve struggled with our sensor platforms drawing too much energy from our Nexii. We would have to pack extra charged battery packs, which would take up space in the limited space we have for our day. When you’re climbing a volcano or a glacier, it’s ideal to carry the least amount of weight as possible.

We’ve ordered about 4 of the LightBlue Beans and they should get here sometime this week. Once they arrive, we’ll play with them and attach sensors to see how well they work. Can’t wait to play with them!

Yoctopuce and Bluetooth

with No Comments

I’ve been doing some research on Yoctopuce and using Bluetooth to communicate with devices, as opposed to USB communication. I could not find any information on using yocto devices with bluetooth. The only official available options are Wifi, USB or Ethernet. This is saddening. Our Yocto ambiance platform is really top-notch, but we need to get rid of cables. They are just not practical. They unplug randomly and we will lose a lot of data in that time. Bluetooth is the only practical option.

I’ve been looking into Arduino sensors on Sparkfun.com and Adafruit to see if we can get the same functionality (and precision) that we can with Yocto devices.