Ambiance and a Feather

with No Comments

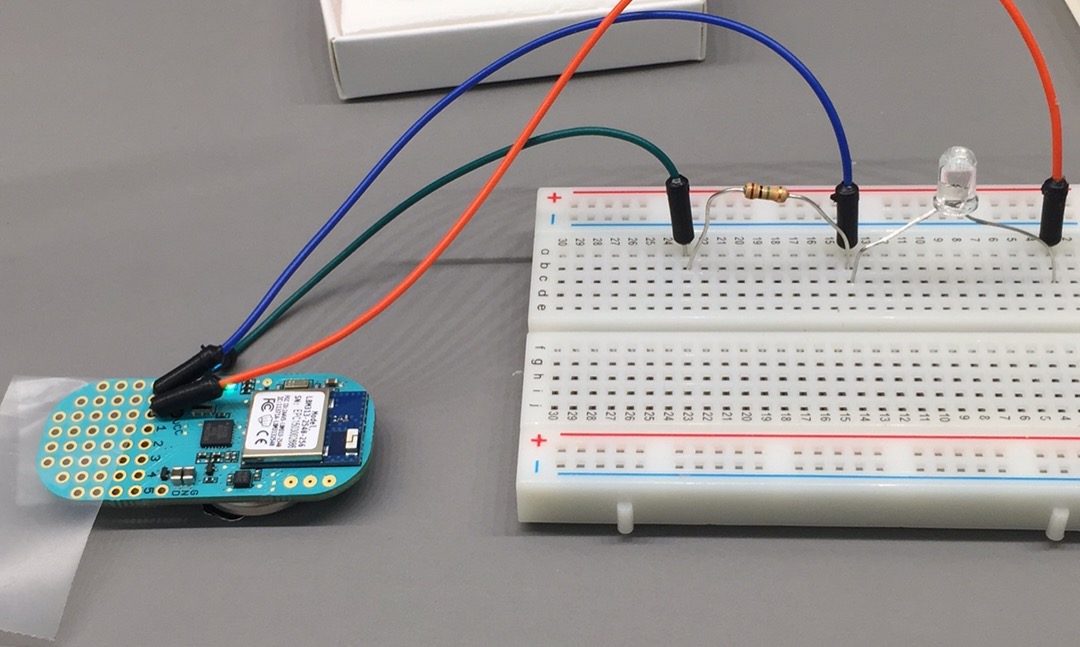
So, it’s been a little while since my last post. Here’s a quick update. I assembled our ambiance platform using the Adafruit feather and two sensors: Altimeter and Temperature, Humidity and Pressure. The Adafruit feather is a tiny BLE capable micro controller (like a Light Blue Bean). We decided to go with the feather because the BLE chip it uses is Nordic, like the Red Bear Labs BLE Shield. With the Nordic chip we can make our own services with UUIDs. The Bean has a built-in set of UUIDs and communicates differently than the Nordic chip.

The platform sensors currently use two different communication protocols: I2C and SPI, but we decided that probably wasn’t going to be a problem. I was able to solder on the sensors to a prototyping board and upload a sketch. I tested without the BLE first time to make sure it was working. It was, thanks to sample code from Adafruit! Adafruit has a different BLE library but it’s all the same principal. I tested the BLE code with Field Day and all works well. A picture of the ambiance platform is below.

Let’s design some stuff

with No Comments

Tara and I designed and prototyped a couple of bench and field devices recently. We have a first pass at a Falcon tube turner, a soil microbe quantifier and a soil temperature and humidity probe.

The Falcon tube turner is designed to be used on a bench to mix soil samples as part of the pH, etc. protocols. Currently it’s based on Lego components, if that basic design works we can easily fabricate a couple robust enough for our needs.

Tara has an idea to quantify the amount of soil microbes by measuring their CO2 respiration. We have data for this from 16S extractions done at one of archeology sites at Skalanes, we can re-sample there and compare the two methods. Pictured below is our first pass at a device for doing this.

IMAG0398

The soil temperature and humidity probe is a combination of a stainless steel soil coring tool with the two probes built-in to the end of the tube, see below (kind-of).

IMAG0399

I’ve been working on reconciling the data model with the implications that Kristin brought when we worked-through the sensor <-> Arduino <-> BLE <-> Android <-> data model. Stay-tuned for the details.

Light Blue Bean!

with No Comments

In my last post, I said that I was going to switch all of our individual fragments of sensors to one that is ‘Bluetooth Sensors.’ Since then, I have finished that and redesigned even more of Field Day.

After I finished switching all the fragments to one, I dove into working on BLE connection with the Light Blue Bean (LBB). Unfortunately, the LBB does not do Bluetooth the same way the Red Bear Labs shield does. The LBB uses something called ‘Scratch Characteristics.’ These are built-in 5 characteristics that can be written and read from the client (in this case, Field Day) and the server (the LBB). These characteristics have set UUIDs, so that means I can’t use the custom UUIDs I set for the RBL’s sensor. After browsing some of the android SDK code from Punchthrough (the people that made the LBB), I was able to determine the UUIDs that are used for the characteristics. Since Field Day is going to have to determine what kind of device it is connected to, I redesigned it so that the fragment is cleaner and doesn’t do any of that work. There are separate classes for a Bluetooth Sensor, GATT Client, and Bluetooth Service. The Service talks to the Sensor and the Sensor talks to the GATT client and determines what type of device it is connected to by checking the UUIDs. All the Fragment does now is say when it wants to write a message or read a message.

Punchthrough has sample code available for arduino and reading and writing the scratch characteristics. The examples along with the SDK has proven helpful when rewriting the android code to accommodate for the Bean. Unfortunately, not many people have used the Bean with Android. All of the examples are with iOS. Field Day is able to read scratch characteristics just fine from the Bean, but is currently unable to write to any characteristics. One huge problem with the bean is that everything is Bluetooth. It’s not like arduino where you plug in the device to your computer to upload code and power it on. This means that the Bean can only be connected to one thing at a time and thus, is really hard to debug. Typically when debugging arduino devices, I’m able to plug the device into my computer and watch the Serial monitor for debugging code I’ve added in. With the Bean, I cannot. It’s blind debugging and it sucks. I’m still working on figuring out how to write a characteristic and have the bean read that characteristic, but I think I’m getting closer. I hope to finish that this week.

This is getting really interesting

with 2 Comments

o On the archeology front, Rannveig found this article about the possibility of a new Viking site being excavated in Newfoundland. They must have stopped along the way from Scandinavia, and Skalanes seems like a nice place for that. Who knows what we’ll find.

o Nic has made some progress with LIDAR, although the gear is proving to be a bit delicate. We’ll probably order a second unit to work with. Here is an early image taken during today’s meeting. The unit is on the round table, on Nic’s screen is the developing point-cloud of the room and contents. If you look very closely you can see people on couches (/very/ closely…)

IMAG0390

o We need to sort a magnetometer before long, hopefully Patrick can loan us one.

o On the logistics front we need to make plane reservations fairly soon. All the lodging and transportation is sorted modulo the ferry to Grimsey, we’ll just wing that early in the morning of the day we travel.

o I started working with our Yocto altimeter recently, we’ll use this as part of the kit that provides more accurate x, y, and z geo-coordinates than consumer grade GPS chipsets alone do.

o Kristin and I worked through most of the details of the interface between FieldDay and the Arduino based sensor platforms. Here is a schematic of it, off to the left is the Postgres database where FieldDay pushes readings in CSV form.

IMAG0389

o I think it’s time we started the Iceland16 playlist, it looks like Spotify is currently the most popular platform for doing so.


BLE in Arduino and Android

with No Comments

I have accomplished quite a bit within the past week, if I do say so myself. Last week, I said that I had begun working on the BLE part of Field Day. Well, after some struggle I finished it! I am able to send a request to the Arduino device and upon receiving that request, the Arduino device sends a message back to the android device and writes to he screen (woo!). But the code is not pretty. Android provides a Bluetooth Low Service example in Android Studio, but it uses deprecated code. I researched and was able to modernize it.

Bluetooth Low Energy is pretty complicated as a service. It uses something called GATT (Generic Attribute Profile). The bluetooth server (arduino device) has a GATT profile and within that GATT profile there are services and services have characteristics. Each service can have multiple characteristics, but there can only be one TX and one RX (read and write) characteristic per service. I learned this the hard way. You can see a diagram of what I’m talking about below.

For the arduino side, we use Red Bear Labs BLE shield. There is a standard BLE library for the arduino but it’s really complex. I’ve read over the code multiple times and I’m just now grasping a little bit of it. RBL has constructed a wrapper for that code. They broke it down into 10 or so different functions, which I must say is mighty useful. I used that when constructing the Arduino code.

During my coding of the BLE on android I discovered that most of our Fragments of sensors are all the same except for the names of them. After talking with Charlie we’ve decided that we’re going to get rid of the individual fragments for each sensors and just have one that is ‘Bluetooth Sensors.’ I’m working on moving the BLE code to that setup now. Hopefully I will be done with it within the day.


GATT

Handlers handling handles

with 1 Comment

After some testing of the Handler implementation in Field Day, I’ve determined that it is actually working! I was finally able to look at the data that I had been writing to the database.

Databases in Android are stored in internal (private) memory. There are Android apps that let you look at the files on your device, but only for external storage. The internal storage is private. What I ended up doing was adding a function to write the database from internal storage to external storage. Once it was on external storage, I used a SQLite Viewer Android app to look at the database and it looks good!

I did some research into the application state when the device screen is turned off. In our old application, Seshat, the activities would die when the screen was off. That’s not good. We want to be able to turn off the screen and hang the Android device from our person some how. It’s useful to have our hands free. After a couple hours of research, I determined the libraries we want to look at are in the PowerManager library on Android, particularly the PARTIAL_WAKE_LOCK state. I wrap the methods I want to happen when the screen is off in what are essentially ‘start’ and ‘stop’ methods. The methods were not executing with the screen off, so I researched some more. I think what will ultimately happen is switching the SensorSampleActivity to a Service. A Service in Android is one of the top priority processes. It’s one of the last to die to if the device needs more memory. It can continue running even if the Activity the started it has died. Since the Activity is now working, I’m going to hold off in converting it to a Service.

The last thing I worked on this week was Bluetooth LE in Android. Tara gave me a BLE shield with an Arduino attached to test my code with those devices. Android provides a BLE example in Android Studio so I’ve been working with that. However, the example they provide has deprecated code so I’m working on modifying it to the new setup. It’s not working yet, but I’ve only been working on it for a couple of hours!

sqlite-fieldday
Sample of sqlite database on Field Day

The Bean arrives!

with No Comments

Last week, the bean arrived! We got four beans in the mail, which came with a ‘Maker Kit.’ The Maker Kit really just contained some headers, a buzzer, and your basic accessories. I was able to connect to all four of the Beans through my computer and my phone! It’s pretty cool that you can connect and upload code right from your phone. The ‘Bean Loader’ computer application integrates with Arduino really well. You write the code in the Arduino IDE, and just send it to the Bean through the Bean Loader. I followed this guide OSX Starting Guide to get started using the bean with my laptop. This is the guide I followed for iOS Guide for setting it up on my iPhone.

Unlike most Arduino board, the Bean has no headers already soldered in. We don’t want to solder right away. We still need to make a prototype and test that it works. So, what I did was set up a little prototyping configuration using a breadboard and some wires. You can see it below — it’s a light sensor. The LED on the Bean gets brighter as it detects more light and dimmer as it detects less light. I was able to get this running with the Bean Example Projects page.

IMG_0408

I’ve been looking through different websites like MakerShed, SparkFun, and Adafruit for different ambiance type sensors. There are many options to choose from, that have a wide range in prices. What sensors to get, we should probably decide as a group. Also, the Bean has a built-in Temperature sensor that we need to test, and perhaps we could cross that off the list of sensors to buy.

LightBlue Bean for Ambiance <3

with 2 Comments

After our meeting last Monday, we have decided to step away from Yoctopuce devices for any platform, but specifically the ambiance platform. Although, the Yoctopuce devices are nice, and have the ‘plug and play’ option, they are expensive and complex (in terms of debugging) compared to other options.

We are moving to Arduino-like design for the Ambiance platform. After some research, I found a device called the LightBlue Bean (see below). The LightBlue Bean is a very small device that is configured entirely through Bluetooth Low Energy. You can even upload code on the go with an Android or IPhone application, which is exactly what we need. The Bean has the same chipset as an Arduino, and even has a built in Temperature sensor. A key characteristic of the LightBlue Bean is the on-board battery. In the past, we’ve struggled with our sensor platforms drawing too much energy from our Nexii. We would have to pack extra charged battery packs, which would take up space in the limited space we have for our day. When you’re climbing a volcano or a glacier, it’s ideal to carry the least amount of weight as possible.

We’ve ordered about 4 of the LightBlue Beans and they should get here sometime this week. Once they arrive, we’ll play with them and attach sensors to see how well they work. Can’t wait to play with them!

Yoctopuce and Bluetooth

with No Comments

I’ve been doing some research on Yoctopuce and using Bluetooth to communicate with devices, as opposed to USB communication. I could not find any information on using yocto devices with bluetooth. The only official available options are Wifi, USB or Ethernet. This is saddening. Our Yocto ambiance platform is really top-notch, but we need to get rid of cables. They are just not practical. They unplug randomly and we will lose a lot of data in that time. Bluetooth is the only practical option.

I’ve been looking into Arduino sensors on Sparkfun.com and Adafruit to see if we can get the same functionality (and precision) that we can with Yocto devices.

What has changed?! $FIELDSCIENCE & YoctoLib

with No Comments

In our $FIELDSCIENCE Android application we use a library from Yoctopuce.com called YoctoLib which works with hardware purchased from them. We use Yoctopuce hardware in our Ambiance platform, and in the Ambiance skin in the app.

This library and code was working — recognizes the USB Yoctopuce devices that are plugged into the device and reading sensor data from them — the last time I used it (~July). Since then, something has gone wrong. The application will no longer read data from the sensors plugged in. I finally got it to at least recognize the device, but no data is being read. I suspect that this happened because of the move to Android Studio. Android Studio must have internally changed the way it uses APIs, which is what I am trying to figure out.

This further pushes me to believe that switching to Bluetooth to use the Yocto devices is necessary. Since the Yocto devices have to plug in via USB, each time I need to test the code, I have to upload the code to the Android device and then unplug the device from the computer so I can plug in the Yocto devices. This makes it difficult for debugging. If the device is plugged into the computer, Android Studio will constantly log messages from any application in real-time to the screen. Android keeps log messages even if the device is unplugged, and will load them once the device is plugged back in, but it’s all the messages (which is A LOT) from the test at once. It’s hard to go back through and figure out where something went wrong.