More Android!

with No Comments

I’ve done a decent amount of work on Android since the previous post. Charlie wanted a ‘Built-In Sensors’ button on to be under the ‘Take a Sample’ button on Field Day. Well, I’ve implemented that.

I’ve written some classes and code where it will query ALL of the available sensors that the device offers. Once it has a list of sensors, it will put them into a ListView and show them to the screen. Most sensors in Android supply 3 values — an x, y, and z. Field Day will query the sensors for values and also display those to the screen. There hasn’t been any work done to the values — they are just displayed as raw.

Implementing this involved created custom ListViews and ArrayAdapters so I was able to show the values and the names of the sensors on the same line. This class, like the other sensors, uses the same geo-coordinates and Satellites and Accuracy values as the other sensors — because it’s a Fragment as well.

I’ve also cleaned up the current code to use the Android suggested changes in Android Studio. Woo-hoo for clean and new code!

Lots of Android Fragments!

with No Comments

This past week I have done a lot with the Android application, Field Day. I’ve implemented the basic architecture that I think we are going to use.

It makes use of Android ‘Fragments’ class. Fragments were introduced to make it nicer when building UIs. Before Fragments (introduced in API 11), whenever a new screen on the Android device was shown, a new Activity was created. Even if only one thing on the page changed, you needed to create a new activity. That meant that there were many lifecycles that needed to be tracked and maintained. That’s drained the battery and made the code more complicated than it needed to be. The Activity lifecycle is complicated. With Fragments, you can easily swap out parts of a UI and still stay in the same lifecycle. The activity that created the fragment controls its lifecycle. There’s no extra ones that need to be maintained.

Right now, there are only about 3 activities, and 5 or 6 fragments. The main screen buttons, and when you click on ‘Take a Sample’ or ‘Lab Notebook’ are all fragments with one activity maintaining them. Once a specific sample type is clicked then the SensorSample.java activity is created. There are parts of the SensorSample activity that are going to be the same no matter what type of sample we are taking. That’s why those are also fragments. Code/UI elements that will be the same for all — Geocoordinate, for example — are on the SensorSample activity’s layout file, but there’s a FrameLayout in there that can be swapped out depending on the type of sample. It really helps with stopping the creation of repetitive code.

In the SensorSample activity, I’ve already implemented a LocationListener and Manager that will listen and update the user’s location. That will be used for the Geocoordinate. It doesn’t get written to the database yet, but I have implemented in both the code and UI so it shows up and does change. I tested it!

SQLite DB for Data.

with 1 Comment

On Saturday, Charlie and I discussed the notion of persistent data for the Field Day android application. Previously, we would stream all of our data to a CSV — even empty lines or entries that are missing data in some spots, and this would cause data to be in a bunch of different data models.

I recently read a chapter on SQLite databases in Android and it seems really powerful. We’ve decided that we are going to use a SQLite database instead of just writing to a CSV file. With this, we could create primary keys and easily pick out all the lines that have empty fields for one column or another. Using a SQLite database will also be useful for our plans to implement an ‘On-Bench’ and ‘In-Field’ option for the soil platform. There are some sensor data that you wouldn’t take in the field and would need to do later that day — like pH or organic content. Using a SQLite database, we’ll be able to simply ask for the sample ID from earlier that day and update it with the pH and Organic Content. Our data will be less messy and we’ll have less random lines of data floating around.

Android Architecture

with No Comments

Nic, Charlie and I have been struggling with finding a time to meet so we can talk about the Field Day android application. We were able to briefly talk about it on Saturday morning, and decided some things about the architecture of the application.

Currently, the main screen of our application shows all 8 “skins” (Earth, Ambiance, Gas, Water, Settings, About, Notepad, and Protocols). We’ve decided that we want the main screen to have just 4 skins (Settings, ‘Take a Sample’, ‘Lab Notebook’, and About). The Take and Sample and Lab Notebook skins, once clicked, will open up into a variety of options underneath. All of the types of sample skins from before (Earth, Ambiance, Gas, and Water) will now move underneath ‘Take a Sample’ skin. Under ‘Lab Notebook’ we are going to move Protocols, Notepad, Checklist and whatever else we decide.

Having a separate page for just sampling will make using fragments a lot easier. I’ve started on making icons for the new skins we decided on, and will implement those in the code as soon as they are ready.

Hopefully today we will be able to talk and get more work done in the meeting.

Gitlab restored!

with No Comments

Unfortunately, I haven’t been able to do much work on the Field Day Android Application. In order for work to be done on that, Gitlab has to be working. Gitlab is where all of the repositories of our code live. And at the beginning of last week, Gitlab was broken.

Gitlab broke due to an accidental upgrade. It was upgraded on hopper from 7.14 -> 8.01 which is a massive upgrade. In versions > 8, there are 2 proxy servers — one the serves git requests (merge, commit, etc.) and one that does authentication. So, that broke Gitlab because there were additional configuration files to create and edit after that upgrade. So, I attempted to downgrade to the version we were using before (7.14) with yum. That was a bad idea. The downgrade with yum isn’t bulletproof and messed up some config files in the process.

Sigh, I upgraded back to 8.01 and tried to find the error. Apache, proxies, and web sockets. Gitlab uses proxies and web sockets, something that Apache (the web server running on hopper) isn’t particularly great at right now. Gitlab really wants to use another web server called Nginx (really, really wants to use Nginx). It even comes bundled with an Nginx install. I tried and failed many times to configure Apache to work with Gitlab and sockets and proxies, but it didn’t work. I couldn’t change the web server on hopper because there are other things relying on it.

I decided that Hopper is probably not the best place to put Gitlab. Alas, I moved it to Dali. Dali has a lot of space and is not running any web servers.Everything on the user side is the same, it just lives on a different machine now.

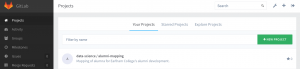
Fortunately, Gitlab comes packed with a way to create a backup of everything and restore from a backup. I created a backup of the current database, repositories, etc on hopper, installed Gitlab on Dali and restored from the backup I created. Poof. 8.01 is now running on Dali and can be accessible at gitlab.cluster.earlham.edu. I even went ahead and set up email notifications for push requests to repositories for the projects in field science and others that I’m working on.

Also, 8.01 is a whole lot better that 7.14 and much prettier!

Screen Shot 2015-10-26 at 1.35.30 PM

Android Fragments

with No Comments

Last week was cut short because of Mid-Sem break, so there’s only a couple days worth of updates. What I’ve mostly been focusing on is trying to draw out the shells of what I think the new Field Day application should look like. Trying to figure out what which classes to create, and how those classes will communicate with each other. For example, if we want to have a sensor class that will create a new instance each time a sensor is connected with the device. And will that class communicate with the communications library, or will the activity communicate with the communications library?

I’ve also been working on learning more about Fragments and whether or not they will be useful for the application. Should each skin be a fragment? What good does that do?

The Bean arrives!

with No Comments

Last week, the bean arrived! We got four beans in the mail, which came with a ‘Maker Kit.’ The Maker Kit really just contained some headers, a buzzer, and your basic accessories. I was able to connect to all four of the Beans through my computer and my phone! It’s pretty cool that you can connect and upload code right from your phone. The ‘Bean Loader’ computer application integrates with Arduino really well. You write the code in the Arduino IDE, and just send it to the Bean through the Bean Loader. I followed this guide OSX Starting Guide to get started using the bean with my laptop. This is the guide I followed for iOS Guide for setting it up on my iPhone.

Unlike most Arduino board, the Bean has no headers already soldered in. We don’t want to solder right away. We still need to make a prototype and test that it works. So, what I did was set up a little prototyping configuration using a breadboard and some wires. You can see it below — it’s a light sensor. The LED on the Bean gets brighter as it detects more light and dimmer as it detects less light. I was able to get this running with the Bean Example Projects page.

IMG_0408

I’ve been looking through different websites like MakerShed, SparkFun, and Adafruit for different ambiance type sensors. There are many options to choose from, that have a wide range in prices. What sensors to get, we should probably decide as a group. Also, the Bean has a built-in Temperature sensor that we need to test, and perhaps we could cross that off the list of sensors to buy.

Field Day Application :)

with No Comments

We’ve begun work on the new $FieldScience Android application! This application is yet to be named, but what do people think of the name FieldDay? I think it’s snappy. 🙂 I created a shell in Android Studio and pushed the code to our Gitlab repo. All of the developers have been able to checkout the code locally to their machines. The old application has been archived and made read-only in Gitlab.

The current developers of the application — Nic, Charlie, and myself — met last week to discuss the details of the application. During the meeting we discussed the basic outline of what we want the application to do. There will be ‘skins’ for each sensor, and all of those will interact with a basic communications library that is built to interact with all of the sensors that we have. There are many things that the old application — Seshat — did well and we discussed those and the pieces of code we want to keep — camera option on sensor skins, writing to csv, sending to database. Android applications have very particular states and processes that they go through. Through some research, we have figured out that they way our old application handled those could have been part of the problem with it crashing a lot. There is still more research to be done in that area, because we don’t fully understand it but we are getting closer.

We are not going to focus on the aesthetics of the application right now, but we did decide that we liked the front/main screen of the old app and will keep it. I’ve added that to the new application with a few enhancements. I made the skins circles and made the colors stand out more. You can see the difference and changes below (Seshat is on the left, new application on the right). Prettier, don’t you think? 

Seshat Main ScreenNew App Main Screen


LightBlue Bean for Ambiance <3

with 2 Comments

After our meeting last Monday, we have decided to step away from Yoctopuce devices for any platform, but specifically the ambiance platform. Although, the Yoctopuce devices are nice, and have the ‘plug and play’ option, they are expensive and complex (in terms of debugging) compared to other options.

We are moving to Arduino-like design for the Ambiance platform. After some research, I found a device called the LightBlue Bean (see below). The LightBlue Bean is a very small device that is configured entirely through Bluetooth Low Energy. You can even upload code on the go with an Android or IPhone application, which is exactly what we need. The Bean has the same chipset as an Arduino, and even has a built in Temperature sensor. A key characteristic of the LightBlue Bean is the on-board battery. In the past, we’ve struggled with our sensor platforms drawing too much energy from our Nexii. We would have to pack extra charged battery packs, which would take up space in the limited space we have for our day. When you’re climbing a volcano or a glacier, it’s ideal to carry the least amount of weight as possible.

We’ve ordered about 4 of the LightBlue Beans and they should get here sometime this week. Once they arrive, we’ll play with them and attach sensors to see how well they work. Can’t wait to play with them!

Yoctopuce and Bluetooth

with No Comments

I’ve been doing some research on Yoctopuce and using Bluetooth to communicate with devices, as opposed to USB communication. I could not find any information on using yocto devices with bluetooth. The only official available options are Wifi, USB or Ethernet. This is saddening. Our Yocto ambiance platform is really top-notch, but we need to get rid of cables. They are just not practical. They unplug randomly and we will lose a lot of data in that time. Bluetooth is the only practical option.

I’ve been looking into Arduino sensors on Sparkfun.com and Adafruit to see if we can get the same functionality (and precision) that we can with Yocto devices.

1 2 3 4