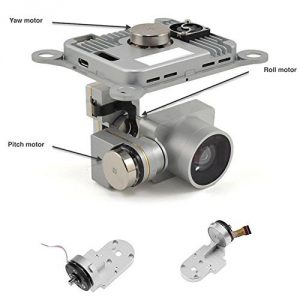
This post is meant to be a fairly general outline to repairing the gimbal on DJI P3As, containing links we used (Rei and Dan) while replacing the arm on Kia after an unfortunate encounter a very breezy day. Will also contain some notes on working on the body and replacing the landing gear.
To repair cracks in the body we used different glues based on the size of the crack. For small hairline cracks, we used Bsi super thin (blue lid). Be careful you only need a little bit and it’s easier to add more than take some off. For larger cracks, we used Bsi gap-filling medium (purple lid). When repairing the body be careful not to glue the frame together, if you don’t want to separate the top and bottom, you can slip a piece of paper in between to prevent supergluing the body together.
After futzing with the ribbon enough times we wore out the adhesive, to replace it we used auto/marine sealant.
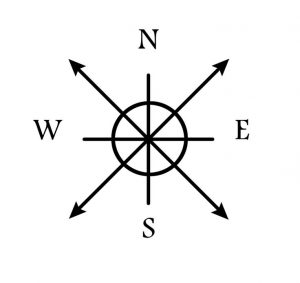
Open the shell using a T-6, T-8, and T-9. Every screw that doesn’t connect the legs needs to come out. There are 8 locks that hold the top and bottom together, one on each of the arms, and one along each face of the body, think a compass with the ordinal as well as cardinal directions where the ordinal are the arms and the cardinal the faces on the body.
Slide a propeller in the space between the top and bottom of each arm, take care to get the propeller under the wire connecting the motor to its board. Move the propellers together, unlock each of the arms catches before starting on the body catches. Be careful with the body catches as they’re close to the delicate electronics.
https://www.youtube.com/watch?v=py2fXSvV40I
Gimbal repair(ribbon cable, arms)-Small Phillips head. Exacto knife, a small flathead, and the green squidge were all very helpful.
https://www.youtube.com/watch?v=A3vCvchnnv0
https://www.youtube.com/watch?v=gqEqu8tBg1g
To replace the ribbon start by attaching the camera connection first as it is the most difficult, and a real PIA to do when everything else is glued in place. Use exacto knives, fingernails, or small flatheads to pop the latch into and out of place, making sure that the cable is inserted all the way to the white line when installing. The cable has to be wrapped around the connection twice, which is what makes this step the most difficult. If you have to undo the connection the easiest way is to put an exacto knife between the outside of the camera case and the cable, with the blunt edge touching the wire as it enters the camera case, and twist the knife in the direction of the cable. We found it easiest to take the cover off each tape as we did it instead of all at once.
MAKE SURE EVERYTHING IS FACING THE CORRECT DIRECTION BEFORE INSTALLING THE WIRE.
-Rei and Dan


Leave a Reply
You must be logged in to post a comment.