Tests of light detection and ranging

with No Comments

Charlie and I had a conversation at the beginning of the week about if the LiDAR module we are using is the “right” one for our purposes. The bottom line is that we don’t exactly know and so I set out to answer that question.

IMG_4301-1IMG_4300

I built a controlled slider that gives us nearly 20cm of movement that we have control over when taking LiDAR measurements. My first test was to place a pencil on the ground and take 1minute of scans at each centimetre. The hope was to be able to pick out the pencil given “perfect” circumstances. After collecting the scan data, which consisted of only the distance in mm and the theta (degree angle at which the scan was take), I then artificially created a Y value corresponding to the 20cm of data taken.

After I got the data into a pleasing form I began to try and visualise it. This proved to be a tad bit difficult and I still don’t have it quite right yet but I was able to see something;

Screen Shot 2016-05-22 at 10.13.41 PM

I am fairly certain that the object towards the top of that screenshot is one of the legs on the tripod that the beam picked up. I am not entirely sure though and will continue to do tests until something is conclusive.

Lundi and LiDAR!

with 1 Comment

I’ll start with the UAV. Now known as Lundi* we have finally started flying. Our initial idea was to fly indoors however our Science Centre has some intense electromagnetic fields (who knew a mostly metal high tech structure would be filled with metal and electric??) so we ended up flying outside after a few initial tests indoors. The tests flights have been in areas we deemed low wind (plenty of building to fly into though) and minimal spectators as to not distract our pilots. Speaking of pilots, Erin and I will be the main controllers of Lundi (and possibly a sister UAV soon) and will begin practicing more and more. The rest of the team will also learn to fly them but only as time permits. The RAW digital negative images .DNG are around the size of 25MB and we can take 3 photos per second. Our next step is to explore the autopilot features of the UAV that will allow us to plot flight patterns.

Now onto LiDAR (we are now styling it as LiDAR). I built a prototype housing for the sensor that allows us to get roughly a 30º angle output. After many frustrating hours with ROS I decided to put it on the shelf for a bit and write my own code. I currently just take sample readings in an .xyz format but the ultimate goal is to pull information from Lundi to give us a full .las file which includes all sorts of useful meta data. Currently the sensor only knows how to take “slides” that are the size of the laser itself but I’m working on getting it to realise its scanning from the top down (part of what the x and y values do) and I can then import it into a point cloud viewer and we should be good to go! Currently in the .xyz format we are getting 600KB/s  which translated into 4.5MB/m. Ive also started to prototype a sort of “slider” for the LiDAR that would allow us to move smoothly across a set distance. This will then be mounted up at our 3m height and scan a patch of grass with a pencil hidden inside, the ultimate goal will be able to pick out the pencil from amongst the blades of grass.

Ill be looking into photogrammetry a bit more asap as well, its proving to be a VERY useful tool.


*we are under the impression that Lundi means puffin in Icelandic, if any of our Icelandic friends know differently please let us know… Id hate to be flying something called “your mothers pants”

LIDAR on mac

with No Comments

As I mentioned in an earlier post, I had only managed to get a working ros lidar work station (environment) working on an ubuntu virtual machine. There are several issues with this though; all of our other developing environments are already in OSX, getting the /dev/ ports configured correctly to ubuntu through OSX is brittle at best and if something goes wrong it borks the entire virtual machine (its just faster to re-install than to actually fix the problem manually), and running the ubuntu vm cuts down on the battery life/processor/ram of the hardware. So with this in mine getting the environment up and running on mac has been a priority.

I was successful in being able to build a working “basic” work station on mac running OS X El Capitan (I’ll put instructions in the gitlab). The basic work station can’t do much except actually launch the visualisation app rviz or any of the other tutorial apps. The next step is to dive into the lidars available SDK for the mac architecture and build a node from that capable of pushing information to the sensor into the visualisation (and other nodes). Luckily the SDK is available in python and C flavours so hopefully it won’t be too complex.

LIDAR Mapping

with No Comments

Okay, so success has smiled upon me (for once)! After many, many, many, many, trials I finally got the LIDAR to map in a real time slam visualisation (I will upload a video example asap). ROS works using a subset of “nodes” for each application, sensor input, etc. So in order to get the slam vis running you have to have the main the LIDAR input stream node running, the slam node running, and then tell them all where to dump their data before finally launching the ros visualisation and hoping that it all works together. Rather than starting them all one by one manually I made a launch file (variation of a bash script) that does everything in the background. I’ve also created a git on the gitlab with some simple instructions, work space and launch files that I’ll update and add more to as time goes on.

Now that the mapping is up I can work on getting things calibrated. The LIDARneeds to be able to map when held sideways and scanning the ground rather than in a single 360º plane. The plan is to take advantage of its positioning. When the LIDAR is not perpendicular to the ground it will simply shut off the laser and not record data points, this way our final “scan” will only be those taken within a tighter angle boundary. Once this is working Ill be trying the LIDAR scanning at 3m (10ft) and see how accurately it picks small objects up. This will translate into how slow the drone has to fly to achieve maximum map resolution.

The other week when I was forced to take the LIDAR unit apart I was able to examine the internal design. The end goal with the LIDAR is to be able to sweep a flat ground surface, this means that we will have to limit the beam to ~30º beam angle. The simplest way to do this will by a custom top housing. The inside part of the top housing will spin freely on its own while the outer part of the top housing will be fixed with a limited view “window.” It will have to be from a material that won’t reflect the laser as to not gather bad data points while its spinning inside the device (though, it would be fairly simple to find these data points and ignore them in the code). Charlie also made the suggestion that the viewing window of the outer housing have shutters of a sort that allow for a change in view angle.

Iceland Soil

with No Comments

This week I have been mostly working on accessing Iceland soil in the ancient DNA lab. The soil was shipped back from Iceland after the trip in 2014. It currently lives in the ancient lab because eventually DNA will be extracted and specific mammalian DNA with specific markers (Horse and a few others) will be amplified. The goal will be to determine what animals were cultivated in the ancient human settlement formerly at the site where the samples were taken.

Today I will follow the sterile lab protocols to take out a very small sample of the soil and bring it to the analytical chem lab to be dried out in an oven, removing all living microbes. The remaining sample will still be usable for DNA extraction, and there will be more than enough left for multiple extractions.

Other than soil, I’m working on using openSCAD to design housing for the sensors that we will 3D print. My first priority is a housing for the TI Nano, followed by the field platform. The Nano needs a case so we can change its orientation 180 degrees and take soil spectra. I would like to get this working soon.

I am making progress on all of the sensor platforms. Kristin has been making a lot of progress on BLE so the sensors should be integrated with Field Day and ready for testing soon.

LIDAR or: how I learned to stop reason and love a challenge

with No Comments

So, LIDAR or light-based-radar availability and price range has dropped considerably over the years to the point of being relatively cheap even. So we jumped at that!

I spent the last bit of time jumping into working with LIDAR. The lidar unit model is capable of 10hz which translates to 2000 samples per second. I initially got the laser to work using a visualisation program known as RVIZ which is part of the Robot Operating System (ROS). ROS is sort of the de-facto open source robot/machine learning system… that being said it is brittle and with very little documentation for use outside of getting set up. I initially tried to get ROS running on my native mac OSX environment but ran into complications running on El Capitan, so ill put that off for a later date.

Through an ubuntu virtual machine (with much trial and error) I finally got a laser point visualisation, which you can see in the video below. What you are looking at is a college student in his natural habitat practicing for his entrance into the ministry of silly walks.

Some time after getting this working, the LIDAR took a small tumble off a desk and stopped working. For a total of 3 days that same college student frantically took the device apart, wiggled a few of the connections and re-aligned the laser sensor with the laser beam using a 3rd party laser source. After that it started working correctly again.

The next step is to get the laser vis into a simultaneous localization and mapping (SLAM) program.


UAV Status and info!

with 1 Comment

We recently purchased and received the UAV drone, a Phantom 3 Advanced. In choosing the drone we looked at a variety of specifications but the important ones was price, flight time, range, camera, and hack-ablility. The P3 Advanced hit right in the sweet spot.

Its priced cheap enough to not break the bank (Charlie’s eyes nearly popped out of his head at the cost of some systems… Charlie might be the bank in this analogy) while providing adequate if not superb performance in other areas. Its got a flight time of ~23 minutes and capable of speeds of roughly 16m/s (35mph) and ascent/descent speeds of 5m/s and 3m/s respectively. When hovering it has a vertical accuracy of +/- 0.1m and horizontal accuracy of +/- 1.5m (more on this with LIDAR onboard). Though no built in wind resistance (fancy speak for the ability to rapidly increasing speed to offset sudden gusts of wind) a pilot monitoring the system will be able to adapt for such things. According to data we have from the Icelandic met office, though windy they have rarely been stronger than 9m/s during the months we will be there.

In terms of range the advanced has one of the best combo systems. On board its got both GPS and GLONAS(read: Russian GPS) capabilities and under perfect conditions will be able to travel up to 5000meters (yeah, thats not an extra 0) away from the ground station. Its ceiling is set at 120m from ground station but capable of working anywhere to 6000meters above sea level. This means that we will be able to set up virtually any flight path for the drone to take within our 23 minute flight before a battery switch is needed. Side note/idea: This will probably be shot down but, because of our need for solar panels with the energy survey if the panels work well we might be able to have a remote charging station for discharged batteries.

The biggest obstacle weather/flight wise will be working rain. I am looking into possible “water resistance” techniques for the drone that are similar to what videographers have done when filming around waterfalls and during mist or light rains. The most common is coating the electronics in some sort of $ever_dry_product, but before we go spraying our drone with strange substances Id like to be absolutely sure of its success. (Big note that this is only a weather resistance in the same way that if you go swimming in a rain coat you will still get wet)

The Advanced’s camera is also a pretty neat piece of technology. First off, its TINY and lightweight but capably of 2.7K(30fps) resolution video and 12MP stills (translates to roughly 4000 x 3000p). The Advanced has the capability to store the stills as DNG RAW format so they retain as much digital info as possible which we can then harvest IR and other spectrums from in post processing. With images and video this high of quality we will be able to apply photogrammetry to measure distances between objects for mapping purposes natively. With a LIDAR sensor added in we should be able to apply these two together and through machine learning get something incredibly comprehensive.

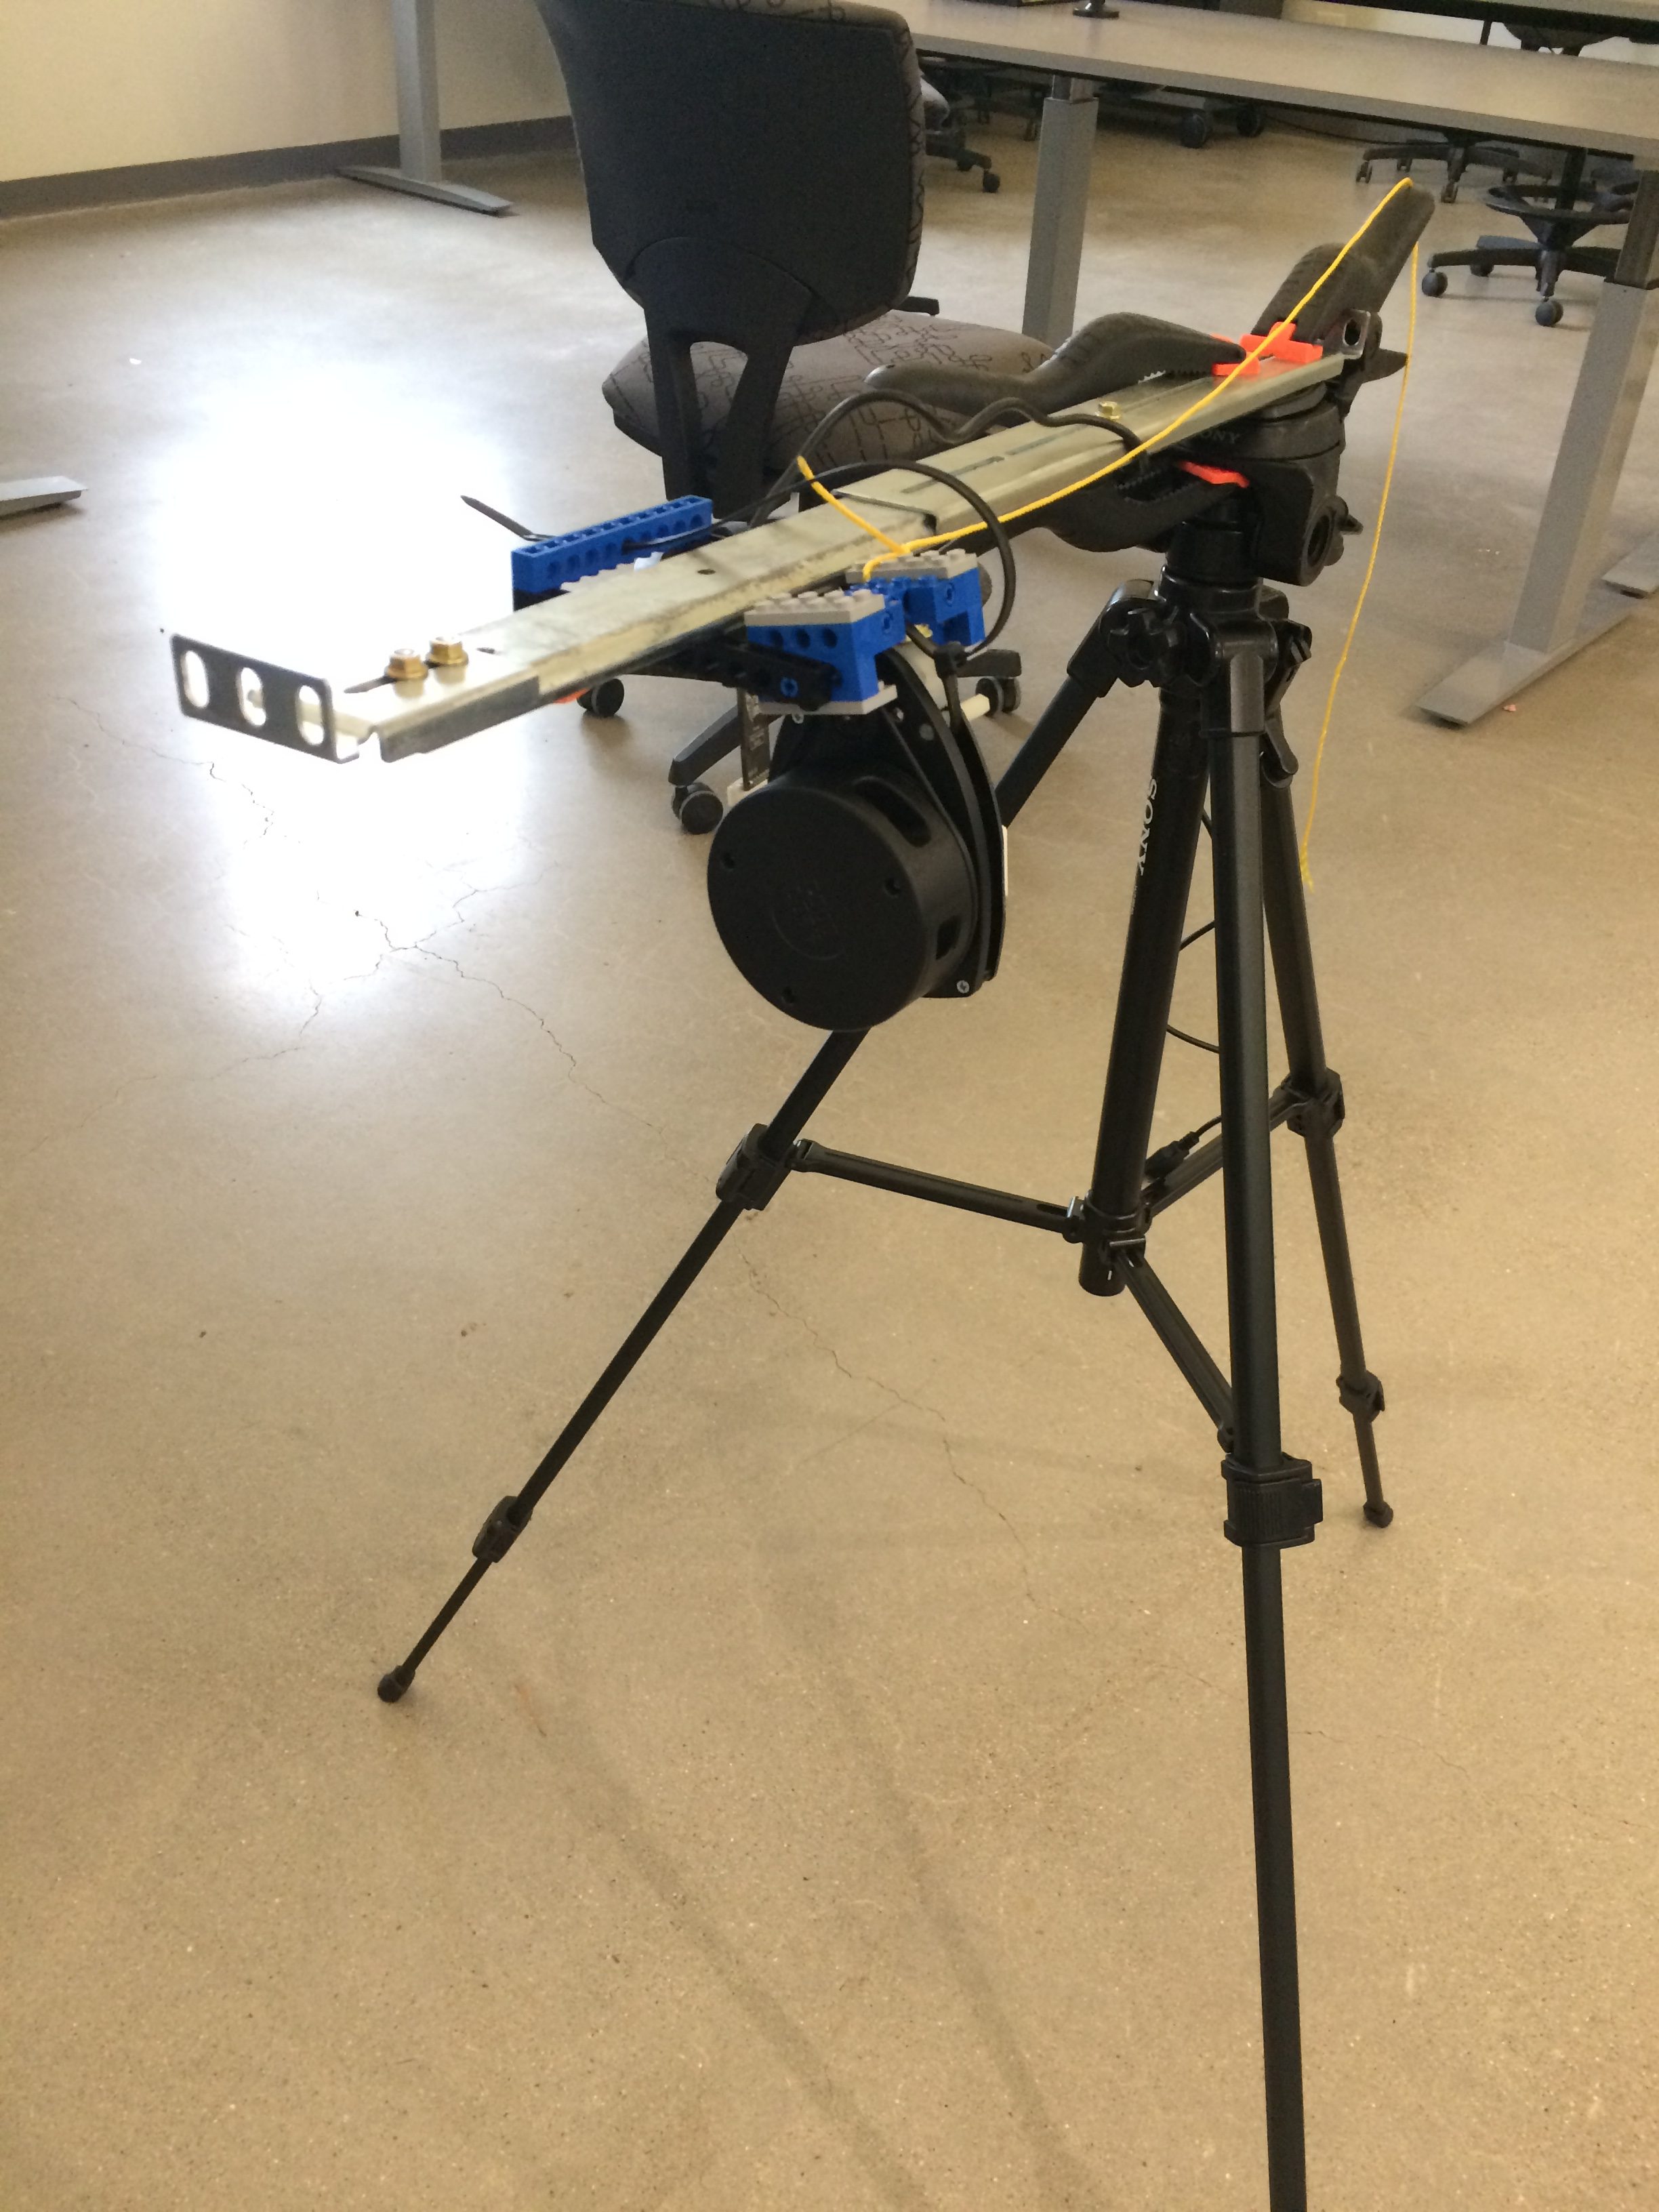
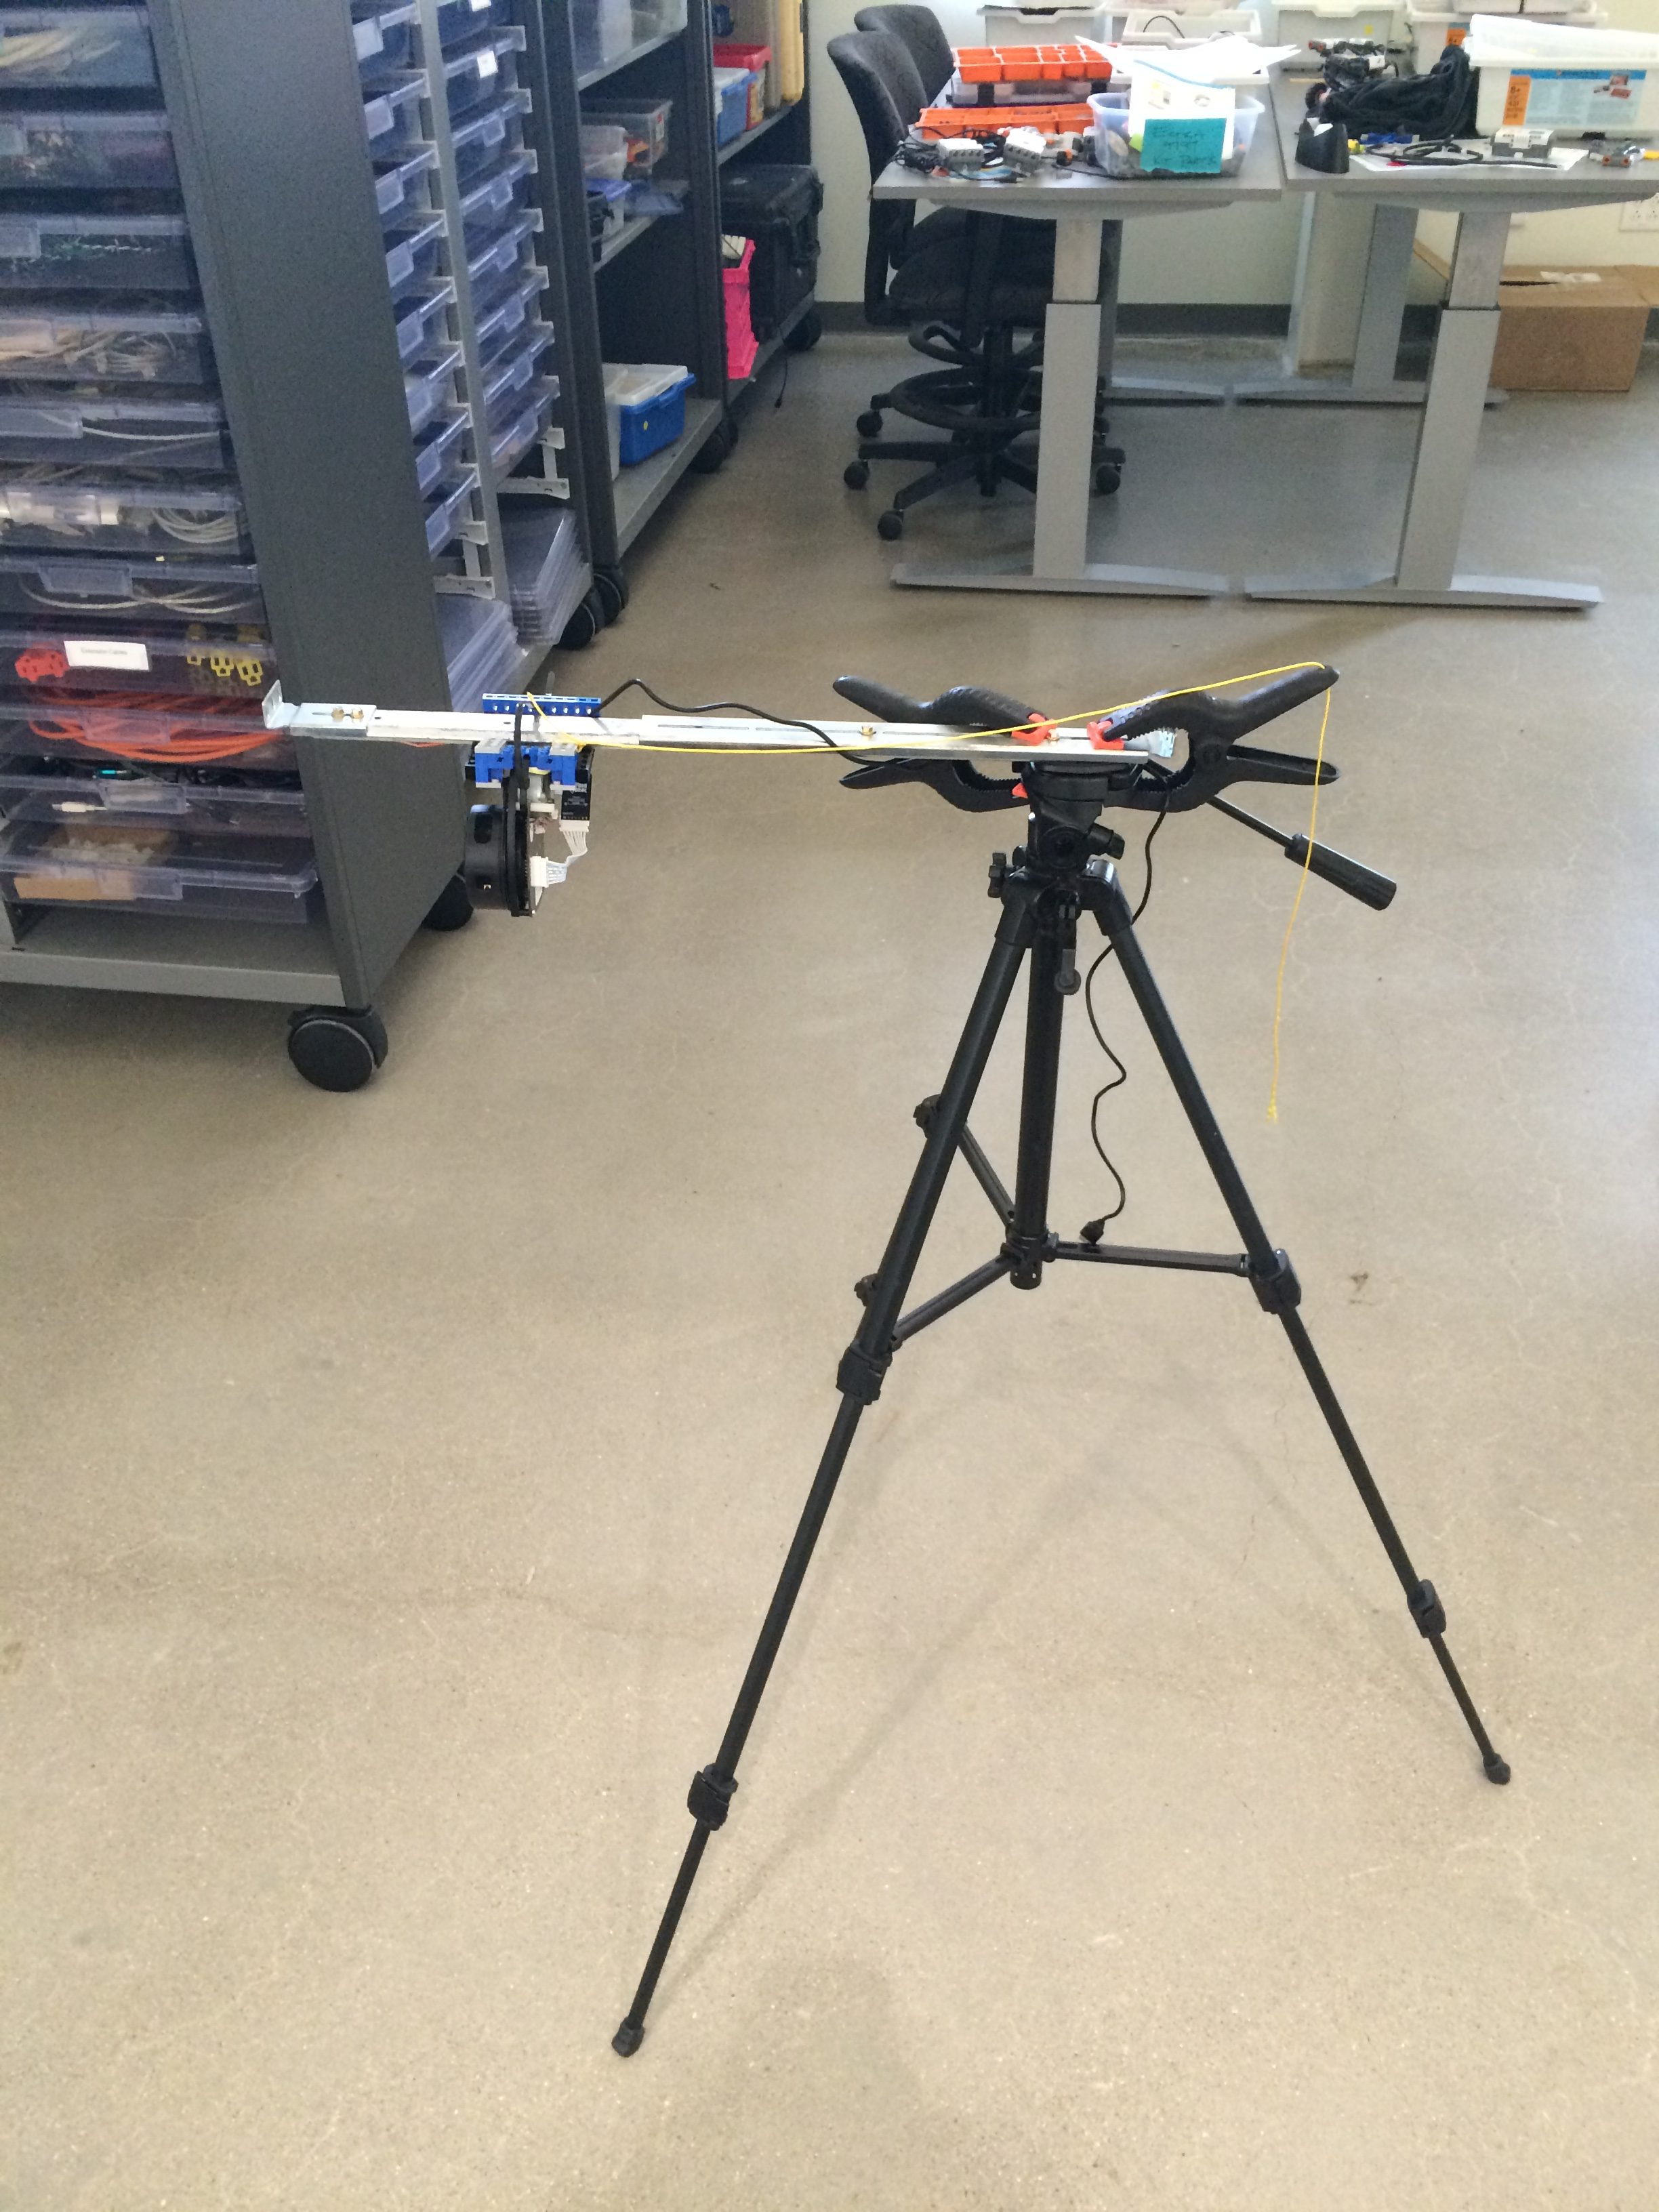
Hack-ability is pretty important for our needs, given that we as a group could probably be called a group of science hackers. There are two flavours of this hack-ableness for the drone; software and hardware. Software is pretty straight forward – DJI is kind enough to provide a developers SDK that gives us the ability to customise and use the drones capabilities. Whats going to be important is finding how we can get this information into the FieldDay app and how thats going to look. Hardware is another thing entirely though. The Phantom series is slightly like Apple in that its a beautifully designed chassis thats not really meant to be played around with (in fact, google only returns hardware changes that deal with aesthetics). So, of course our plan is to stick a modular LIDAR system on the back of it which may require quite a few body modifications!

Looking forward I’ll be planning out how our ground station will work with the drone. This is most likely going to mean a laptop computer + tablet + controller + batteries in the field (My laptop is a 13″ macbook pro with 16GB RAM and a 256GB SSD). The waypoint guide system or “drone” part of the UAV will probably be easiest to do with a laptop and we can get some fancy features from having an actual computer near at hand. The controller itself will be near by for manual piloting, this uses a tablet as view finder/some controls. At highest quality video (2.7K resolution, 30fps) the advanced will record about 3GB per 10 minutes. Given the flight time will be ~23 minutes it’s probably going to be ~8 to 10GB per flight captured with video + lidar. Luckily on board the Advanced can hold a 64GB extreme speed SD Card to help with storage. The flight data will most likely be stored on laptop in the field and then transferred to backups once at basecamp. As part of the ground station the laptop is probably going to be running some form of mapping program for real time mappings (this will be looked at further down the road).

Lastly and most important: The drone needs a name. I’ll be taking suggestions. (Kristin says Bob is not an option fyi)

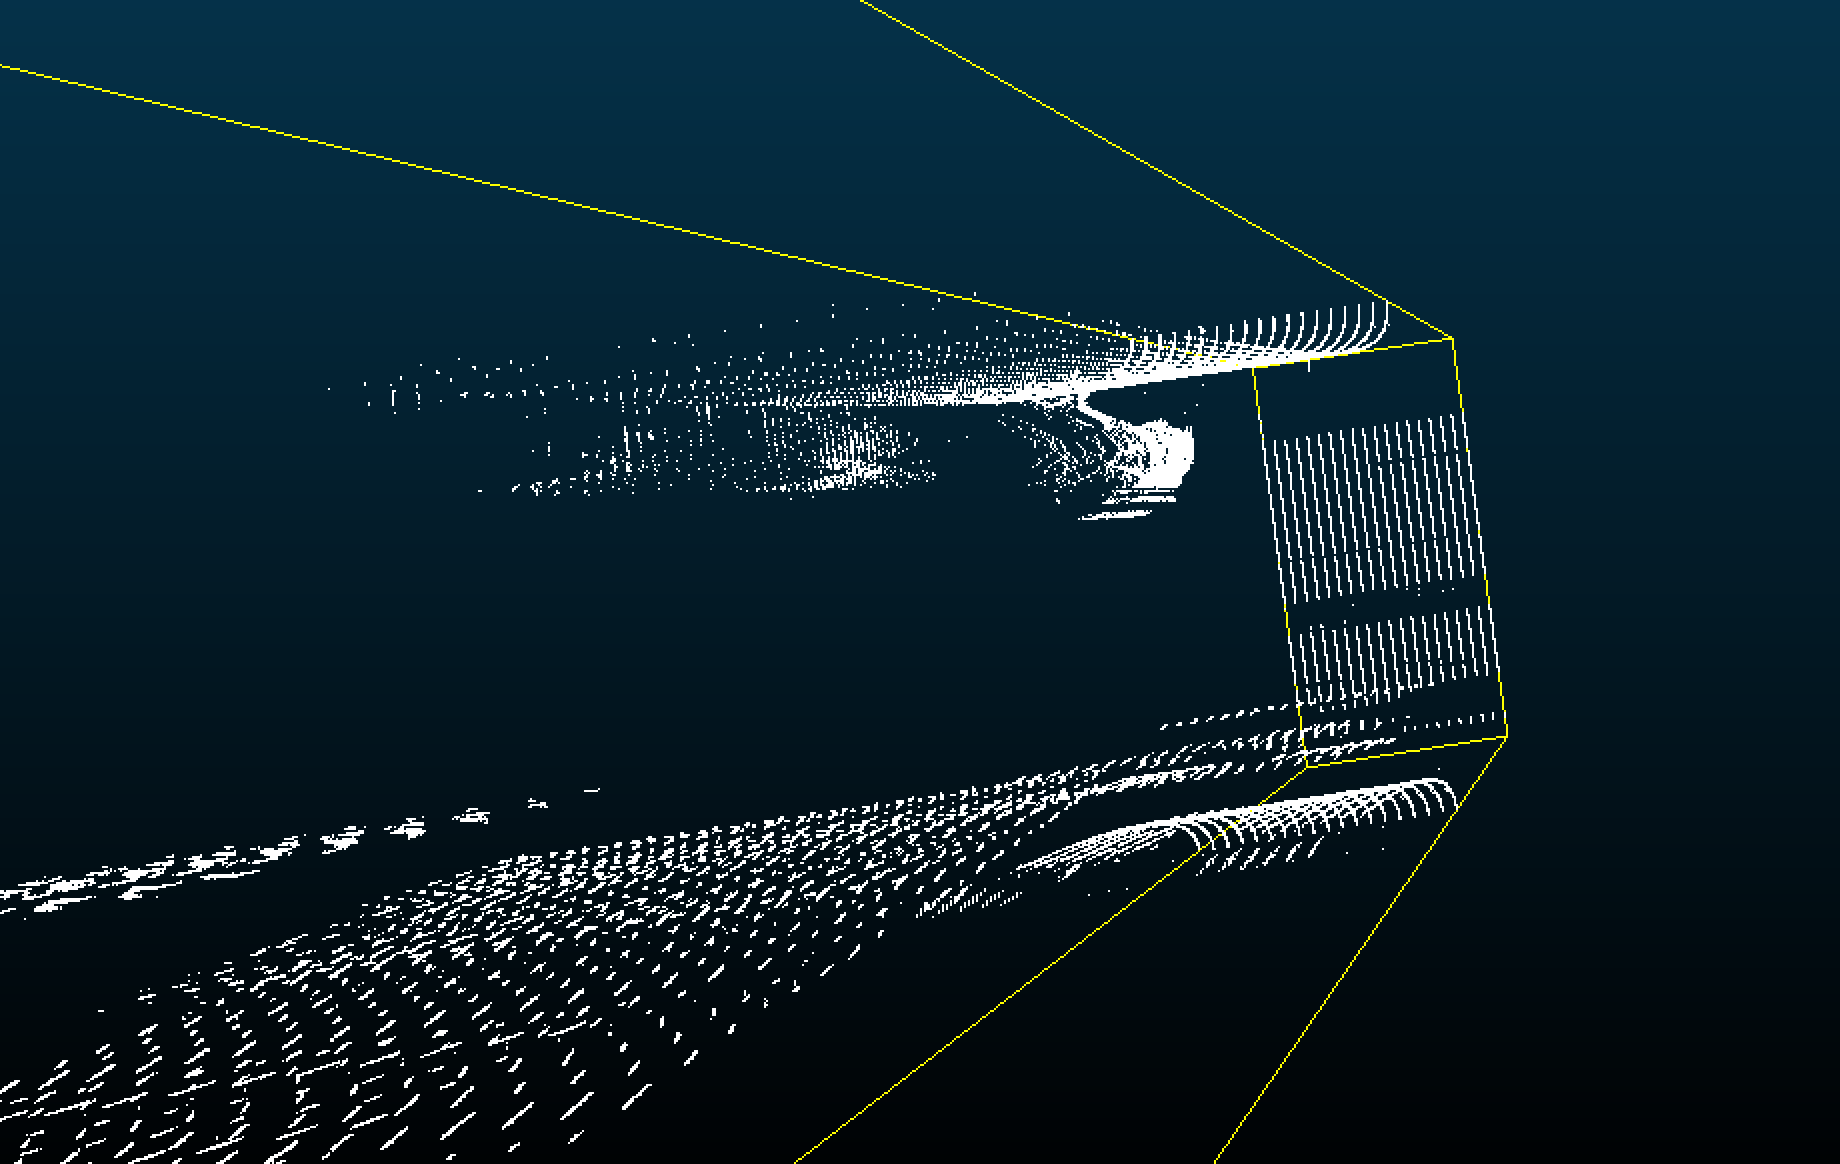
I’ve mentioned a LIDAR system several times, so please look at this post for further reading!


1 2